
!["[New] The Year Ahead Exploring Instagram's Innovative Filters for 2024"](https://www.lifewire.com/thmb/jYRcfPdtNI6tXDgrTbnTO06LdQ4=/540x405/filters:no_upscale():max_bytes(150000):strip_icc()/ScreenShot2022-04-08at12.07.28PM-362efc4e7603490a932bf9ac6e0f0113.png)
"[New] The Year Ahead Exploring Instagram's Innovative Filters for 2024"
The Year Ahead: Exploring Instagram’s Innovative Filters
How to Use Filters on Instagram?

Shanoon Cox
Mar 27, 2024• Proven solutions
With the new Instagram update, many individuals have noticed that the layout has become a bit complex. Similarly, the feature to apply filters has also become complicated, making the users wonder how to use filters on Insta? If you are experiencing the same issue, then don’t worry! You have strolled upon the right article. In this article, you’ll discover how to use Instagram filters on feed posts, stories, and reels. So, make sure to skim through the whole article to apply filters on Instagram successfully.
- Part 1: What is an Instagram Filter?
- Part 2: How to Add Filters on Instagram Story?
- Part 3: How to Apply Filters to Instagram Posts?
- Part 4: How to Add Filters on Instagram Reels?
- Part 5: How to Organize the Instagram Filters?
Part 1: What is an Instagram Filter?
The Instagram filter is a valuable tool that enables you to alter your picture with a single click by making relevant adjustments to the photo on Instagram. The feature for the Instagram filter was released in 2011 with a few basic choices for filtering your image. It provides the user with multiple ways to edit a picture with more excellent quality, an extra border, and even some significant tilt-shift effects. Because of the easy and friendly layout of Instagram, it is much easier for the user to apply filters. And, it is better to keep your application updated as Instagram is constantly releasing new layouts for the convenience of its users.
This feature, although user-friendly, might be confusing for some. That is why we will show you how to enhance your posts and stories in a few simple steps.
Part 2: How to Add Filters to a Photo and Video on Instagram Story?
With the easy layout provided by Instagram, it is incredibly easy to edit your pictures. Specifically, talking about adding filters to a photo or video on the Instagram story is probably the easiest thing to do on Instagram, and it does not even take much time. Adding filters to your photo or video can take a maximum of five minutes to do so.
Following are the steps to add filters to a photo and video on Instagram Story, so you no longer have to worry about how to use filters on Insta. Make sure you follow every step so you can successfully get the job done.
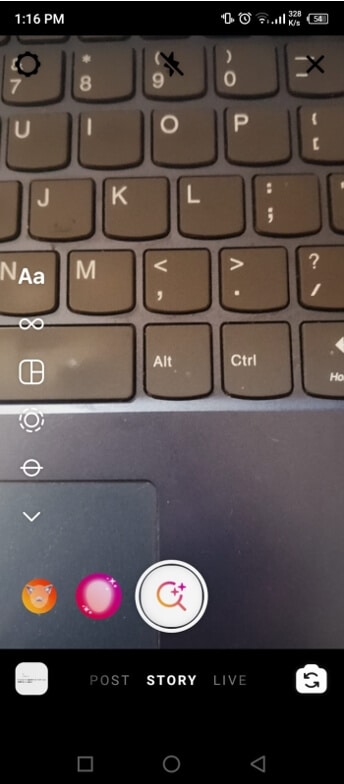
Step 1: Select or Capture a Photo/Video
The initial step is to open your camera on Instagram and swipe up to select an existing picture/video or capture a photo/video to apply a filter.
Note: Another way to add an existing picture is to tap on the bottom left corner, where you can see the photo gallery icon. Next, tap on the image you want to apply the filter on.
Step 2: Tap on a Filter
Now that you have selected a photo, an editing screen will be displayed on your device. Tap on a specific filter of your choice by swiping through the effects displayed on the editing screen to add effects to your existing picture/video.
Note: If you do not like the effects displayed on the screen, browse other filters by tapping on the search option.
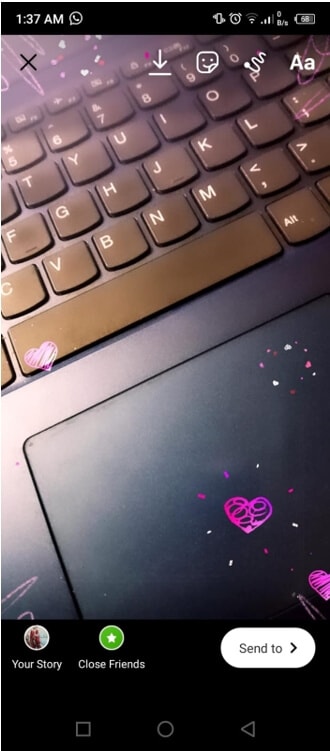
Step 3: Add the Picture/Video to Story
Tap on Done once you have chosen a filter. And then, add the picture/video to your Instagram story by clicking on the icon labeled Your Story.
Part 3: How to Apply Filters to Instagram Posts and Carousel Posts?b
Applying filters to your Instagram posts is just as easy as adding filters to an Instagram story. Adding filters to your posts can make your profile look more attractive and thus improve engagement. Though the method is different for both cases, they have the same effect. Applying filters to your posts can enhance their quality and result in more likes and comments.
Follow the steps given below to add filters to your Instagram post or carousel post effortlessly.
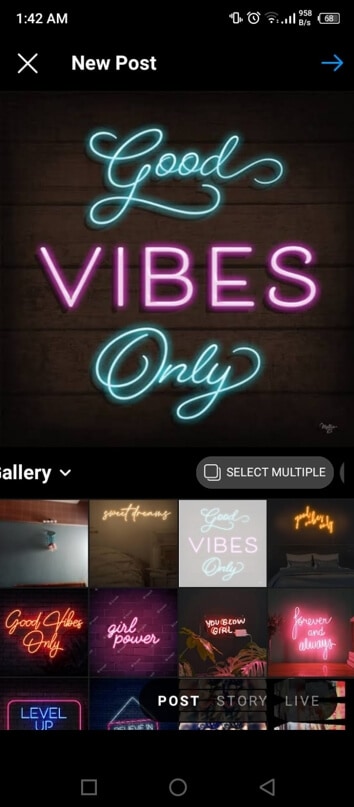
Step 1: Tap on the Plus Icon
The initial step is to tap on the Plus icon at the bottom of the screen. Then select an existing picture or capture a photo for further editing.
Note: For a carousel post, long press on a picture and select other pictures you want to add to your Instagram post.
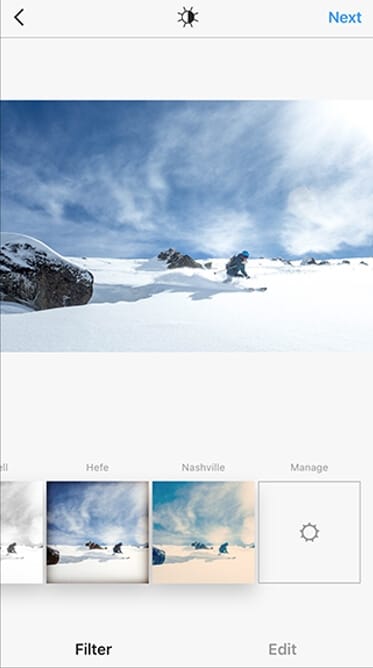
Step 2: Tap on Next Post
Next, tap on the Next icon present at the top right corner to apply filters to your photo. Then tap on the specific picture you want to apply a filter on and tap on a filter to add it. You can even further edit by tapping on the option to Edit at the bottom right corner.
Note: If you tap on the filter for the second time, an option to control the filter’s intensity will be shown. Adjust it accordingly to your preference.
Step 3: Share your Post
Once you are done with all the relevant editing needed, tap on the Done. A screen will be displayed to add a caption and location. Once you have completed editing your photo, tap on the Share option at the top right corner.
Part 4: How to Add Filters on Instagram Reels?
Instagram Reels are very similar to TikTok videos, with the iconic feature of uploading entertaining short fifteen-second videos as Instagram Reels. Instagram reels are one of the most prominent features of the new updated version of the Instagram Application.
This method is quite similar to that of applying filters to Instagram stories. For your ease, we have listed a step-by-step guide below to add filters on Instagram reels.
Step 1: Go to Create Mode
Tap on the camera icon on the top left corner of the screen. And then, tap on the Reels option to go to Instagram reels create mode.
Note: Another way to create an Instagram Reel is to go to the reels explore page and tap on the camera icon present at the top right corner of the screen.
Step 2: Tap on the Smiley Face Icon
Next, tap on the Smiley Face Icon to add filters. Choose from the variety of available filters. Then tap on the chosen filter to apply it to your Instagram reel.
Step 3: Start Recording
Once you are done selecting the desired filter for your Instagram reel, start recording. After the recording is done, you will notice the filter added to the whole Instagram reel you just shot.
Part 5: How to Organize the Instagram Filters for Post/Reels/Feed?
Instagram is a great application that offers a wide range of filters to its users. Even though it’s a great feature and very beneficial for the users to choose among the variety, it can be annoying to skim through the long list to find a specific filter. For that sole reason, Instagram provides the user with the option to hide certain filters or rearrange them to find a filter of your preference easily.
The steps below are a guide to organizing the filters for your Instagram Post/Reels/Feed.
Step 1: Tap on Manage Option
The initial step is to select or capture a photo/video. Go to the filters screen and scroll to the end of the list to tap on the Manage option. It is a settings option specifically for the filters feature.
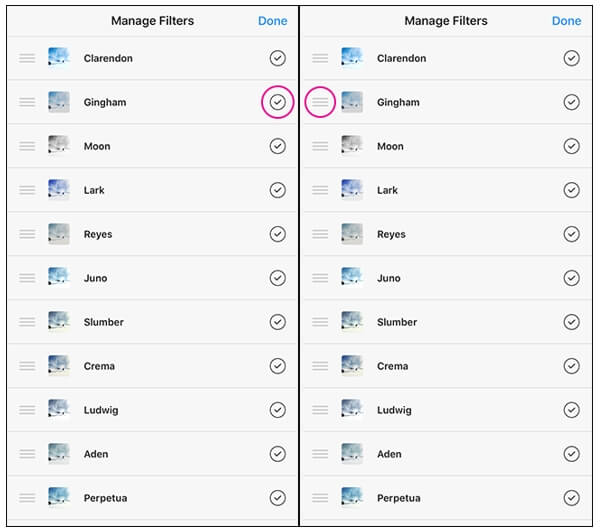
Step 2: Rearrange or Hide Filters
For rearranging your filters, hold and drag the three lines on the left side of the specified filter to wherever you want it to be. As for hiding a specific filter, tap on the circle present at the right side of the filter. When the tick sign disappears and the color of the title of the filter fades, it means that the filter has been hidden.
Note: Another way to rearrange or hide filters is to do it from the filters screen. Long press on the specified filter and drag it to the position you want it to be. And drop the filter on the Drag to hide option to hide the selected filter. You can always turn off this feature from the manage menu.
Step 3: Tap Done
Once you have made the required adjustments, tap on the Done option present at the top right corner of the screen. And you are done rearranging the filters!
Conclusion
For many individuals, using Instagram might not be as easy as it is for the new generation. It could be because some individuals find the layout to be a bit complicated, which might be the reason why they are not able to apply filters.
But don’t panic! In this article, we have talked about the nitty-gritty on how to use filters on Insta. And that’s about it on how to use filters on Instagram.
Even though keeping the application updated is crucial, it is also essential to follow each step thoroughly to add filters to your Instagram Post/Feed/Story effortlessly. You won’t face any issue if you follow the steps exactly as mentioned.
Shanoon Cox
Shanoon Cox is a writer and a lover of all things video.
Follow @Shanoon Cox
Shanoon Cox
Mar 27, 2024• Proven solutions
With the new Instagram update, many individuals have noticed that the layout has become a bit complex. Similarly, the feature to apply filters has also become complicated, making the users wonder how to use filters on Insta? If you are experiencing the same issue, then don’t worry! You have strolled upon the right article. In this article, you’ll discover how to use Instagram filters on feed posts, stories, and reels. So, make sure to skim through the whole article to apply filters on Instagram successfully.
- Part 1: What is an Instagram Filter?
- Part 2: How to Add Filters on Instagram Story?
- Part 3: How to Apply Filters to Instagram Posts?
- Part 4: How to Add Filters on Instagram Reels?
- Part 5: How to Organize the Instagram Filters?
Part 1: What is an Instagram Filter?
The Instagram filter is a valuable tool that enables you to alter your picture with a single click by making relevant adjustments to the photo on Instagram. The feature for the Instagram filter was released in 2011 with a few basic choices for filtering your image. It provides the user with multiple ways to edit a picture with more excellent quality, an extra border, and even some significant tilt-shift effects. Because of the easy and friendly layout of Instagram, it is much easier for the user to apply filters. And, it is better to keep your application updated as Instagram is constantly releasing new layouts for the convenience of its users.
This feature, although user-friendly, might be confusing for some. That is why we will show you how to enhance your posts and stories in a few simple steps.
Part 2: How to Add Filters to a Photo and Video on Instagram Story?
With the easy layout provided by Instagram, it is incredibly easy to edit your pictures. Specifically, talking about adding filters to a photo or video on the Instagram story is probably the easiest thing to do on Instagram, and it does not even take much time. Adding filters to your photo or video can take a maximum of five minutes to do so.
Following are the steps to add filters to a photo and video on Instagram Story, so you no longer have to worry about how to use filters on Insta. Make sure you follow every step so you can successfully get the job done.
Step 1: Select or Capture a Photo/Video
The initial step is to open your camera on Instagram and swipe up to select an existing picture/video or capture a photo/video to apply a filter.
Note: Another way to add an existing picture is to tap on the bottom left corner, where you can see the photo gallery icon. Next, tap on the image you want to apply the filter on.
Step 2: Tap on a Filter
Now that you have selected a photo, an editing screen will be displayed on your device. Tap on a specific filter of your choice by swiping through the effects displayed on the editing screen to add effects to your existing picture/video.
Note: If you do not like the effects displayed on the screen, browse other filters by tapping on the search option.
Step 3: Add the Picture/Video to Story
Tap on Done once you have chosen a filter. And then, add the picture/video to your Instagram story by clicking on the icon labeled Your Story.
Part 3: How to Apply Filters to Instagram Posts and Carousel Posts?b
Applying filters to your Instagram posts is just as easy as adding filters to an Instagram story. Adding filters to your posts can make your profile look more attractive and thus improve engagement. Though the method is different for both cases, they have the same effect. Applying filters to your posts can enhance their quality and result in more likes and comments.
Follow the steps given below to add filters to your Instagram post or carousel post effortlessly.
Step 1: Tap on the Plus Icon
The initial step is to tap on the Plus icon at the bottom of the screen. Then select an existing picture or capture a photo for further editing.
Note: For a carousel post, long press on a picture and select other pictures you want to add to your Instagram post.
Step 2: Tap on Next Post
Next, tap on the Next icon present at the top right corner to apply filters to your photo. Then tap on the specific picture you want to apply a filter on and tap on a filter to add it. You can even further edit by tapping on the option to Edit at the bottom right corner.
Note: If you tap on the filter for the second time, an option to control the filter’s intensity will be shown. Adjust it accordingly to your preference.
Step 3: Share your Post
Once you are done with all the relevant editing needed, tap on the Done. A screen will be displayed to add a caption and location. Once you have completed editing your photo, tap on the Share option at the top right corner.
Part 4: How to Add Filters on Instagram Reels?
Instagram Reels are very similar to TikTok videos, with the iconic feature of uploading entertaining short fifteen-second videos as Instagram Reels. Instagram reels are one of the most prominent features of the new updated version of the Instagram Application.
This method is quite similar to that of applying filters to Instagram stories. For your ease, we have listed a step-by-step guide below to add filters on Instagram reels.
Step 1: Go to Create Mode
Tap on the camera icon on the top left corner of the screen. And then, tap on the Reels option to go to Instagram reels create mode.
Note: Another way to create an Instagram Reel is to go to the reels explore page and tap on the camera icon present at the top right corner of the screen.
Step 2: Tap on the Smiley Face Icon
Next, tap on the Smiley Face Icon to add filters. Choose from the variety of available filters. Then tap on the chosen filter to apply it to your Instagram reel.
Step 3: Start Recording
Once you are done selecting the desired filter for your Instagram reel, start recording. After the recording is done, you will notice the filter added to the whole Instagram reel you just shot.
Part 5: How to Organize the Instagram Filters for Post/Reels/Feed?
Instagram is a great application that offers a wide range of filters to its users. Even though it’s a great feature and very beneficial for the users to choose among the variety, it can be annoying to skim through the long list to find a specific filter. For that sole reason, Instagram provides the user with the option to hide certain filters or rearrange them to find a filter of your preference easily.
The steps below are a guide to organizing the filters for your Instagram Post/Reels/Feed.
Step 1: Tap on Manage Option
The initial step is to select or capture a photo/video. Go to the filters screen and scroll to the end of the list to tap on the Manage option. It is a settings option specifically for the filters feature.
Step 2: Rearrange or Hide Filters
For rearranging your filters, hold and drag the three lines on the left side of the specified filter to wherever you want it to be. As for hiding a specific filter, tap on the circle present at the right side of the filter. When the tick sign disappears and the color of the title of the filter fades, it means that the filter has been hidden.
Note: Another way to rearrange or hide filters is to do it from the filters screen. Long press on the specified filter and drag it to the position you want it to be. And drop the filter on the Drag to hide option to hide the selected filter. You can always turn off this feature from the manage menu.
Step 3: Tap Done
Once you have made the required adjustments, tap on the Done option present at the top right corner of the screen. And you are done rearranging the filters!
Conclusion
For many individuals, using Instagram might not be as easy as it is for the new generation. It could be because some individuals find the layout to be a bit complicated, which might be the reason why they are not able to apply filters.
But don’t panic! In this article, we have talked about the nitty-gritty on how to use filters on Insta. And that’s about it on how to use filters on Instagram.
Even though keeping the application updated is crucial, it is also essential to follow each step thoroughly to add filters to your Instagram Post/Feed/Story effortlessly. You won’t face any issue if you follow the steps exactly as mentioned.
Shanoon Cox
Shanoon Cox is a writer and a lover of all things video.
Follow @Shanoon Cox
Also read:
- [Updated] Insta-Angle Alchemy Crafting Content with a Twist for Maximum Impact for 2024
- [New] Maintain Peaceful Posting Dismiss IG Recommendations
- [Updated] 2024 Approved Ignite Dialogue Innovative Questions in IG Story Lives
- 2024 Approved Monitoring Friends Lost in Instagram World
- 2024 Approved Unlocking the Power of Scheduled Instagram Posts
- [Updated] Pushing the Envelope on Instagram Larger Videos Explained
- [Updated] In 2024, Masterclass in Visual Updates IGTV Cover Photos
- [Updated] 2024 Approved From Portrait to Landscape The Ultimate Guide to Instagram Video Spins
- [New] Strategic Steps for Sky-High Insta Video View Counts
- [New] 2024 Approved Be the Life of the Party Uploading & Sharing GIFs on Instagram [Instant Guide]
- [New] In 2024, Unlock the Full Potential of Your Videos on Instagram Platform
- [New] In 2024, Revealing the Top 10 Secret Story Admirers
- Instagram Filter Mastery - Essential Skills
- [New] In 2024, Unlocking Insta Stardom 15 Effortless Steps Towards Rapid and Sustained Fame
- [New] Crafting Personalized Instagram Story Sections for 2024
- Best IGTV Sources for Daily Inspiration for 2024
- [Updated] Distinguished Crafters Superior Online Instagram HLV Creators for 2024
- [New] Boost Your Brand Visibility with Top Hashtag Strategies
- [New] Mastering Instagram Media The Finest Downloading Options
- [Updated] Instagram Filters for the Win Maximize Likes & Comments Effortlessly for 2024
- 2024 Approved Insights Into Instagram An In-Depth Analysis Guide for Professionals
- [Updated] In 2024, The Ultimate Social Surge Amass 1K on IG Each Month for a Million Dream
- [Updated] 2024 Approved Social Scrutiny Who Felt the Glance on Your Insta Image?
- [New] Instagram's Best Tools Ranked Editors to Elevate Reels for 2024
- [New] In 2024, Secure Social Space End Following Protocols
- [Updated] 2024 Approved Dissecting Popularity Ten Facts About Reels, Unmasked
- [New] In 2024, The Insider's Guide to Mastering IGTV
- Boosting User Interaction Mastering Hashtag Use on Instagram
- [New] 2024 Approved Enrich Your Visuals Captions on the Go in Instagram
- [New] 2024 Approved Expanding Your Audience Syncing IGTV & Facebook
- [Updated] Disclosing the Top 10 Hidden Story Enthusiasts for 2024
- In 2024, The Art of Instagram Filter Selection Tips for the Year 2023
- Reel in the Solution to Instagram Video Glitches for 2024
- 2024 Approved Essential, Forgotten Tips for Instagram Proficiency
- [New] Instagram Harmony A Comprehensive Song Selection Methodology
- [Updated] Formulating Attractive Instagram Story Captions for 2024
- Unleash Your Brand’s Potential on IGTV with These Top 10 Tactics for 2024
- [New] Inverted Intrigue Mastering the Art of Turning Photos for Instagram Glory for 2024
- [New] Instagram Friendships Unlocked Leading Free & Safe Follower-Finding Tools (iOS/Android) for 2024
- [Updated] In 2024, Integrate with Ease An In-Depth Look at Instagram's Music Icons
- [Updated] Syncing Vimeo and Instagram The Ultimate Guide
- [New] In 2024, Interactive Features
- [Updated] 2024 Approved Protocols for Preserving Instagram Footage on Windows/macOS Platforms
- 2024 Approved Premiered Top 8 Crowd-Pleasing AE Setups
- [Updated] Essential Guide to Enhancing Video Content on Instagram for 2024
- [Updated] In 2024, Unlocking the Potential of Your Content with IGTV Hashtags
- In 2024, Effortless Solutions for Instagram Video Archiving
- [Updated] Revitalizing Past Moments with Instagram Filters for 2024
- [Updated] In 2024, Saying Goodbye to Instagram Forever A Detailed Walkthrough
- Unlock Itel Phone Password Without Factory Reset Full Guide Here
- New 2024 Approved 33 Best Video Splitter Recommended
- Updated 2024 Approved Top Mac Video Editors of A Comprehensive Review
- Easy steps to recover deleted photos from Camon 20 Premier 5G.
- 2024 Approved Top Text Animation Tools
- In 2024, Top-Rated Mac MP3 Converters A Comprehensive Guide
- Complete Tutorial to Use GPS Joystick to Fake GPS Location On Samsung Galaxy A05s | Dr.fone
- New 2024 Approved Easy Steps to Create AI Twitch Streamer with Animated Avatars
- Compressor in FCPX A Beginners Guide to Efficient Video Encoding
- In 2024, The Ultimate Guide to Configuring & Analyzing Facebook's Instream Ads
- How to Fix the Soft Bricked Oppo A79 5G? | Dr.fone
- New Unbiased Comparison Final Cut Pro vs LumaFusion for Video Post-Production
- In 2024, Unlock iPhone 13 mini With Forgotten Passcode Different Methods You Can Try | Dr.fone
- Audiovisual Integration Incorporating Audio Waveform and Creative Animation Into DaVinci Resolve
- [New] Native Chrome OS Screen Replay App for 2024
- How to Come up With the Best Pokemon Team On Oppo K11x? | Dr.fone
- In 2024, Top 10 Fingerprint Lock Apps to Lock Your Realme GT Neo 5 SE Phone
- [Updated] Reimagining Focus The New Age of Zooming Clear for 2024
- 2024 Approved 10 Best Convert Video Between GIF Software High Quality
- In 2024, Free Video FX Apps The Ultimate List for iOS and Android
- 2024 Approved WhatsApp Room Assembly Guide
- Planning to Use a Pokemon Go Joystick on Lava Yuva 3 Pro? | Dr.fone
- Simple and Effective Ways to Change Your Country on YouTube App Of your Vivo X90S | Dr.fone
- [New] Navigating the Maze of Audio Capturing A Complete Minecraft Guide on Mac for 2024
- Why Your WhatsApp Live Location is Not Updating and How to Fix on your Apple iPhone 12 mini | Dr.fone
- [New] In 2024, Foreground Emphasis Tips for Logitech Video Recordings
- In 2024, How to Transfer Apps from Tecno Spark 10C to Another | Dr.fone
- 2024 Approved Conquer Any Gadget to Record Your YouTube Live Experience
- [New] Breaking News Working OBS Cam
- 2024 Approved Expert Tips Securing Your Best Gaming Moments with 4 Methods
- In 2024, S Best Stop Motion Animation Programs for Creatives
- 2024 Approved FCP X Visual Effects Green Screen and Beyond
- In 2024, Step Into Pro Audio Recording on Your Mac Using Audacity
- New 2024 Approved Easy Ways to Make Procreate GIFs
- [New] Trending Tales Top 10 Captivating Tweets of Today for 2024
- How Can I Catch the Regional Pokémon without Traveling On Honor 100 Pro | Dr.fone
- [Updated] Navigating Orientation Options for Facebook Videos
- In 2024, Find My App Troubleshooting No Location Found vs. Location Not Available & How to Fix Them On Apple iPhone 13 mini | Dr.fone
- In 2024, How To Remove the Two Factor Authentication On Apple iPhone 15
- Gmail Not Working on Honor X50 7 Common Problems & Fixes | Dr.fone
- In 2024, Unlock the Power of Facebook with These Top 5 Chrome Tools
- Updated Easy Cartoon Characters Drawing Tutorials for You Who Are Learning to Draw
- Title: "[New] The Year Ahead Exploring Instagram's Innovative Filters for 2024"
- Author: David
- Created at : 2024-05-21 19:36:01
- Updated at : 2024-05-22 19:36:01
- Link: https://instagram-video-recordings.techidaily.com/new-the-year-ahead-exploring-instagrams-innovative-filters-for-2024/
- License: This work is licensed under CC BY-NC-SA 4.0.
