![[Updated] Elevate Instagram's Visual Feast Integrating Audio Effects](https://thmb.techidaily.com/08f2c817ace11f52f69518bb589ba81c382ee3c50cca52847005eac86a562eee.jpg)
"[Updated] Elevate Instagram's Visual Feast Integrating Audio Effects"
Elevate Instagram’s Visual Feast: Integrating Audio Effects
Polish Your Instagram Reels Video Easily
Wondershare Filmora is one of the best video editors to edit Instagram Reels video on Windows and Mac. Download and have a try.
Instagram Reels , a new feature, which is taking Instagram by storm. It’s pretty similar to TikTok , meaning it lets you create a short video clip and lasts from 15 to 30 seconds. If you already have an Instagram account, you might have already seen the Reel feature. While creating a Reel, you can make it look and sound better by adding background music and filter. You can share your Reel on your story, and they will appear on the Reels tab on your profile. You can consider Instagram Reels to be an upgraded version of Instagram Stories. It appears on the Story section, doesn’t disappear after 24 hours, and lets you connect with your audience in a better way.
Since Instagram Reels are the coolest new thing to happen to this generation, try to make your Instagram Reel as exciting as possible. One way to go about it is by adding music to your reels. Let others feel pumped up while watching your Reel and engage with it better. So, if you want to know how to add music to Instagram reels, keep reading this post and find out how to do that.
In this article
01 Add Background Music to Instagram Reels While Recording
02 Add Music to Reels After Recording
03 Find Trending Songs and Add Them to Your Reels
04 Add Your Own Background Music to Reels
05 Add Your Own Voice to Instagram Reels
06 How to Save Reels with Music?
07 Add Music to Instagram Reels Business Account

Part 1: How to Add Background Music to Instagram Reels While Recording
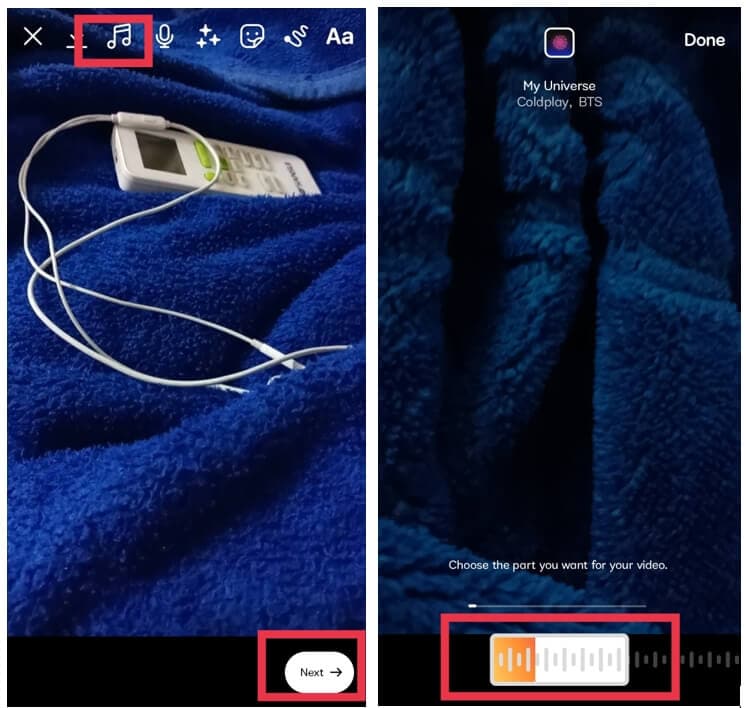
First, let’s find out how to add music to reels on Instagram when you record something. The steps to follow are easy. Just follow this step-by-step guide, and you will know-how.
Step 1: Launch your Instagram account and click on your profile picture. The same process that you do to upload a Story.
Step 2: Once done, look at the bottom of your screen, and you will see the Reels option. Please click on that.

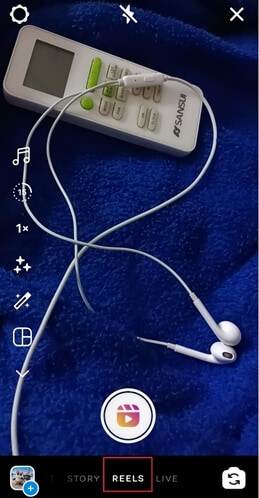
Step 3: Now, tap on the record option to record something on Reels.

WPS Office Premium ( File Recovery, Photo Scanning, Convert PDF)–Yearly
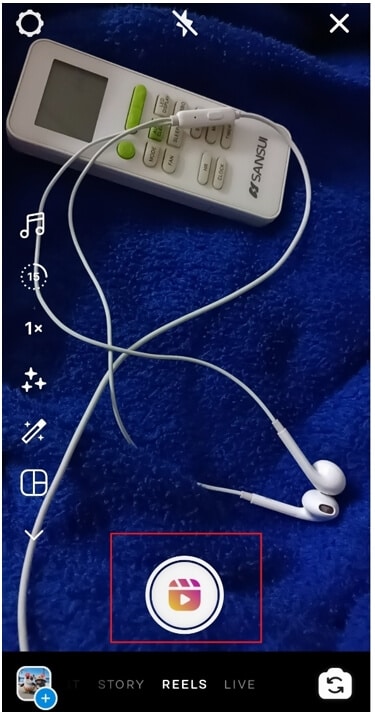
Step 4: While recording it, you can click on the Music icon to add a song. Alternatively, before recording a video for your Reel, you can tap on the Music icon, search for the song you want to add, and add it.
 Easy GIF Animator is a powerful animated GIF editor and the top tool for creating animated pictures, banners, buttons and GIF videos. You get extensive animation editing features, animation effects, unmatched image quality and optimization for the web. No other GIF animation software matches our features and ease of use, that’s why Easy GIF Animator is so popular.
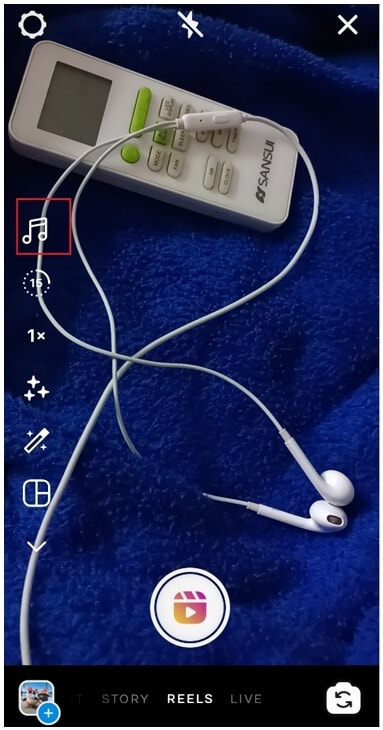
Step 5: Use the slider bar to select the part of the song that you want to keep. You can adjust the slider to use a different section of the song as well.

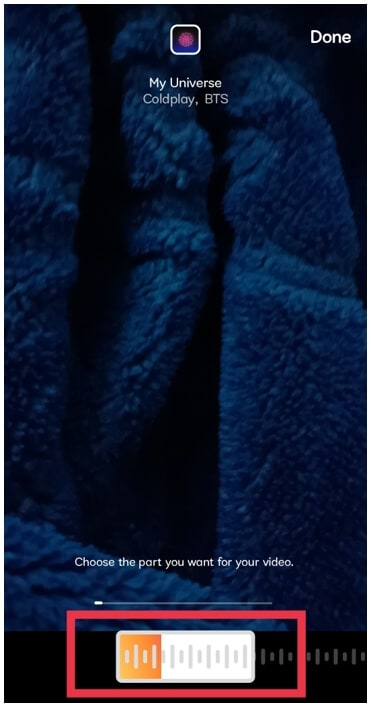
Once you are done recording your video along with the background music, click on the preview option to see how your Reel will look like with the audio.
Part 2: How to Add Music to Reels After Recording?
Instagram lets you add music after you complete your recording as well. This option is suitable for those who often forget to add music while they are recording their video. Here’s your how to add music to reels after recording steps:
Step 1: Click on your Instagram profile picture, and then click on the Reels option to start recording a video.
Step 2: After recording your video, click on the Music icon, and then you will be taken to the Music library page. On the search bar, type the song name you want to add, and the song will be added to the video.
Part 3: How to Find Trending Songs and Add Them to Your Reels?
Let’s say you have seen a trending song on multiple Instagram Reels and you feel inspired to use the same track for your Reel too. The good news is that you don’t have to keep searching for the Music section for the trending track. Instagram ensures to make adding Music as a background sound easy. Follow the steps that we have written below:
Step 1: Open the Reel whose background music you like, and you will see the name of the song right at the bottom. You need to click on that.

Step 2: After clicking on the song name, you find other Reels who have used the same track. Along with it, you will also see the Use Audio option. Please tap on that.
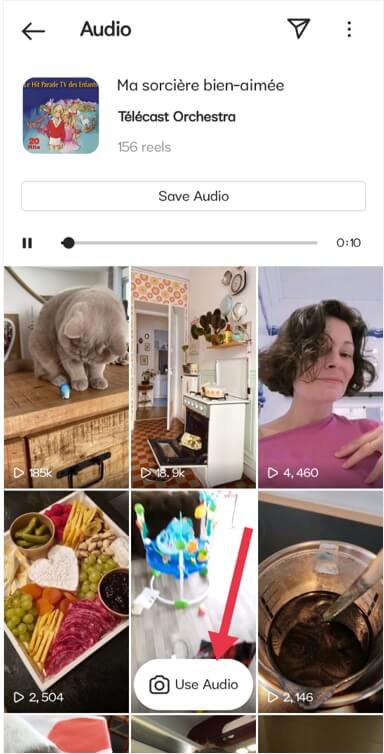
Step 3: The moment you tap on the Use Audio option, you will be taken to your Reel recording page. Start recording the video you want, and the selected song will be played in the background.
Part 4: How to Add Your Own Background Music to Reels?
In case you don’t want to use any of the songs from Reel’s music section, instead use something of your own; you can do that too! All you will have to do is use any of the music apps on your phone with your Instagram account. Then, play your favorite song, and while doing that, start recording a reel. The music that is being played will be added to the Reel.
 SwifDoo PDF Perpetual (2-PC) Free upgrade. No monthly fees ever.
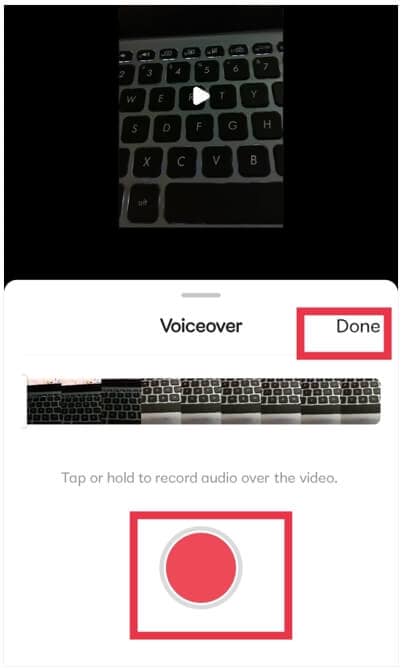
Part 5: How to Add Your Own Voice to Instagram Reels?
If you don’t want to add music as your background sound, instead use your voice as a voiceover; Instagram has the voiceover feature that will let you do that. However, you can apply this feature only after finishing your recording.
Step 1: Open your Instagram account and click on your profile to start recording for your Reel. And then record the video as usual for the Reel.
Step 2: If you want to add music, you can do that; if not, just let it be. After the recording is done, you will be taken to another page. Here, you will see some option right at the top of the recorded video. Click on the Microphone icon.
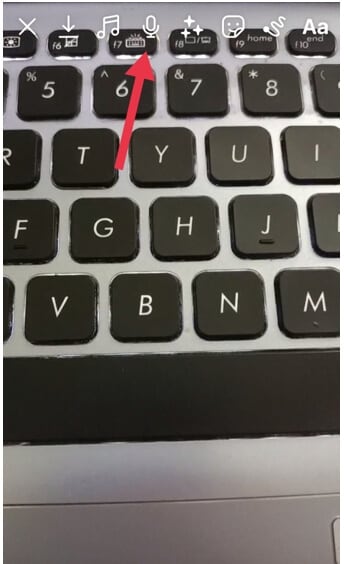
Step 3: Now, start recording your voice. Once you are done recording your voice, click on the Done option.
Part 6: How to Save Reels with Music?
Although the Reels stay there on your profile in the Reels section, they don’t get saved on your mobile automatically. So, if you want to know how to save reels with music on your device, here are the steps you need to follow:
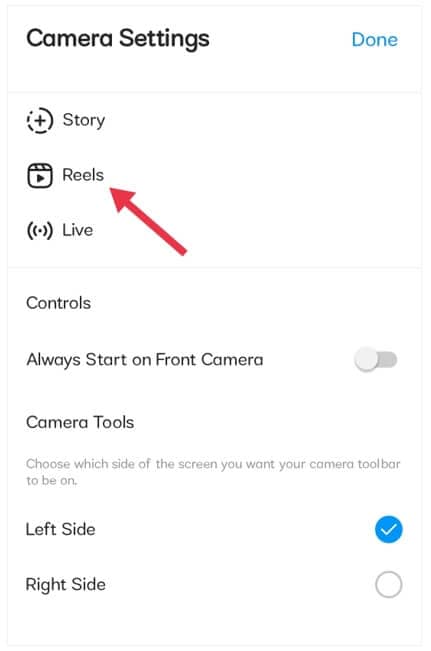
Step 1: Go to your Instagram account and click on your profile picture. When the page appears where you can add a Post, Story, or Reel, you need to click on the top left gear icon, which is the Camera Settings icon.

Step 2: The Camera Settings will show you three things, Story, Reels, Live. You need to click on the Reels option.
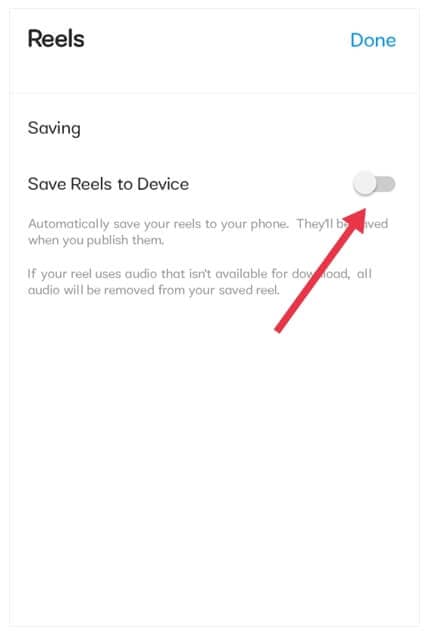
Step 3: Now, toggle the Save Reels to Device option to automatically save the Reels you create on your mobile.

Part 7: How to Add Music to Instagram Reels Business Account?
Adding music to a regular Instagram Reels account is easy. You can pick any song that you like and add it as a background sound. However, when it comes to business accounts, there is a restriction. Business accounts can’t add any recording artists’ music to their reels. That’s due to some copyright issues. But, if you have original music, you can add that to your Reel. The key is to search for a song with the words “Original Music.”
Conclusion
Instagram Reels are beneficial for everyone. Whether you are an influencer, celebrity, brand, or someone who likes to have fun using Instagram, Reels are suitable for everyone. It lets you create a short video that enables you to engage with your followers. And after reading this post, we are sure that you have learned how to add audio to your Reel.
Instagram Reels , a new feature, which is taking Instagram by storm. It’s pretty similar to TikTok , meaning it lets you create a short video clip and lasts from 15 to 30 seconds. If you already have an Instagram account, you might have already seen the Reel feature. While creating a Reel, you can make it look and sound better by adding background music and filter. You can share your Reel on your story, and they will appear on the Reels tab on your profile. You can consider Instagram Reels to be an upgraded version of Instagram Stories. It appears on the Story section, doesn’t disappear after 24 hours, and lets you connect with your audience in a better way.
Since Instagram Reels are the coolest new thing to happen to this generation, try to make your Instagram Reel as exciting as possible. One way to go about it is by adding music to your reels. Let others feel pumped up while watching your Reel and engage with it better. So, if you want to know how to add music to Instagram reels, keep reading this post and find out how to do that.
In this article
01 Add Background Music to Instagram Reels While Recording
02 Add Music to Reels After Recording
03 Find Trending Songs and Add Them to Your Reels
04 Add Your Own Background Music to Reels
05 Add Your Own Voice to Instagram Reels
06 How to Save Reels with Music?
07 Add Music to Instagram Reels Business Account

Part 1: How to Add Background Music to Instagram Reels While Recording
First, let’s find out how to add music to reels on Instagram when you record something. The steps to follow are easy. Just follow this step-by-step guide, and you will know-how.
Step 1: Launch your Instagram account and click on your profile picture. The same process that you do to upload a Story.
Step 2: Once done, look at the bottom of your screen, and you will see the Reels option. Please click on that.
Step 3: Now, tap on the record option to record something on Reels.
 Easy and Safe Partition Software & Hard Disk Manager
Step 4: While recording it, you can click on the Music icon to add a song. Alternatively, before recording a video for your Reel, you can tap on the Music icon, search for the song you want to add, and add it.
Parental Control Software
Step 5: Use the slider bar to select the part of the song that you want to keep. You can adjust the slider to use a different section of the song as well.
Once you are done recording your video along with the background music, click on the preview option to see how your Reel will look like with the audio.
Part 2: How to Add Music to Reels After Recording?
Instagram lets you add music after you complete your recording as well. This option is suitable for those who often forget to add music while they are recording their video. Here’s your how to add music to reels after recording steps:
Step 1: Click on your Instagram profile picture, and then click on the Reels option to start recording a video.
Step 2: After recording your video, click on the Music icon, and then you will be taken to the Music library page. On the search bar, type the song name you want to add, and the song will be added to the video.

Part 3: How to Find Trending Songs and Add Them to Your Reels?
Let’s say you have seen a trending song on multiple Instagram Reels and you feel inspired to use the same track for your Reel too. The good news is that you don’t have to keep searching for the Music section for the trending track. Instagram ensures to make adding Music as a background sound easy. Follow the steps that we have written below:
Step 1: Open the Reel whose background music you like, and you will see the name of the song right at the bottom. You need to click on that.
Step 2: After clicking on the song name, you find other Reels who have used the same track. Along with it, you will also see the Use Audio option. Please tap on that.
Step 3: The moment you tap on the Use Audio option, you will be taken to your Reel recording page. Start recording the video you want, and the selected song will be played in the background.
Part 4: How to Add Your Own Background Music to Reels?
In case you don’t want to use any of the songs from Reel’s music section, instead use something of your own; you can do that too! All you will have to do is use any of the music apps on your phone with your Instagram account. Then, play your favorite song, and while doing that, start recording a reel. The music that is being played will be added to the Reel.
Part 5: How to Add Your Own Voice to Instagram Reels?
If you don’t want to add music as your background sound, instead use your voice as a voiceover; Instagram has the voiceover feature that will let you do that. However, you can apply this feature only after finishing your recording.
Step 1: Open your Instagram account and click on your profile to start recording for your Reel. And then record the video as usual for the Reel.
Step 2: If you want to add music, you can do that; if not, just let it be. After the recording is done, you will be taken to another page. Here, you will see some option right at the top of the recorded video. Click on the Microphone icon.

Step 3: Now, start recording your voice. Once you are done recording your voice, click on the Done option.
Part 6: How to Save Reels with Music?
Although the Reels stay there on your profile in the Reels section, they don’t get saved on your mobile automatically. So, if you want to know how to save reels with music on your device, here are the steps you need to follow:
Step 1: Go to your Instagram account and click on your profile picture. When the page appears where you can add a Post, Story, or Reel, you need to click on the top left gear icon, which is the Camera Settings icon.
 PCDJ Karaoki is the complete professional karaoke software designed for KJs and karaoke venues. Karaoki includes an advanced automatic singer rotation list with singer history, key control, news ticker, next singers screen, a song book exporter and printer, a jukebox background music player and many other features designed so you can host karaoke shows faster and easier!
Step 2: The Camera Settings will show you three things, Story, Reels, Live. You need to click on the Reels option.
Step 3: Now, toggle the Save Reels to Device option to automatically save the Reels you create on your mobile.
 PDF application, powered by AI-based OCR, for unified workflows with both digital and scanned documents.
 WonderFox DVD Ripper Pro
Part 7: How to Add Music to Instagram Reels Business Account?
Adding music to a regular Instagram Reels account is easy. You can pick any song that you like and add it as a background sound. However, when it comes to business accounts, there is a restriction. Business accounts can’t add any recording artists’ music to their reels. That’s due to some copyright issues. But, if you have original music, you can add that to your Reel. The key is to search for a song with the words “Original Music.”
Conclusion
Instagram Reels are beneficial for everyone. Whether you are an influencer, celebrity, brand, or someone who likes to have fun using Instagram, Reels are suitable for everyone. It lets you create a short video that enables you to engage with your followers. And after reading this post, we are sure that you have learned how to add audio to your Reel.
Instagram Reels , a new feature, which is taking Instagram by storm. It’s pretty similar to TikTok , meaning it lets you create a short video clip and lasts from 15 to 30 seconds. If you already have an Instagram account, you might have already seen the Reel feature. While creating a Reel, you can make it look and sound better by adding background music and filter. You can share your Reel on your story, and they will appear on the Reels tab on your profile. You can consider Instagram Reels to be an upgraded version of Instagram Stories. It appears on the Story section, doesn’t disappear after 24 hours, and lets you connect with your audience in a better way.
Since Instagram Reels are the coolest new thing to happen to this generation, try to make your Instagram Reel as exciting as possible. One way to go about it is by adding music to your reels. Let others feel pumped up while watching your Reel and engage with it better. So, if you want to know how to add music to Instagram reels, keep reading this post and find out how to do that.
In this article
01 Add Background Music to Instagram Reels While Recording
02 Add Music to Reels After Recording
03 Find Trending Songs and Add Them to Your Reels
04 Add Your Own Background Music to Reels
05 Add Your Own Voice to Instagram Reels
06 How to Save Reels with Music?
07 Add Music to Instagram Reels Business Account

Part 1: How to Add Background Music to Instagram Reels While Recording
First, let’s find out how to add music to reels on Instagram when you record something. The steps to follow are easy. Just follow this step-by-step guide, and you will know-how.
Step 1: Launch your Instagram account and click on your profile picture. The same process that you do to upload a Story.
Step 2: Once done, look at the bottom of your screen, and you will see the Reels option. Please click on that.
Step 3: Now, tap on the record option to record something on Reels.
Step 4: While recording it, you can click on the Music icon to add a song. Alternatively, before recording a video for your Reel, you can tap on the Music icon, search for the song you want to add, and add it.
Step 5: Use the slider bar to select the part of the song that you want to keep. You can adjust the slider to use a different section of the song as well.
Once you are done recording your video along with the background music, click on the preview option to see how your Reel will look like with the audio.
Part 2: How to Add Music to Reels After Recording?
Instagram lets you add music after you complete your recording as well. This option is suitable for those who often forget to add music while they are recording their video. Here’s your how to add music to reels after recording steps:
Step 1: Click on your Instagram profile picture, and then click on the Reels option to start recording a video.
Step 2: After recording your video, click on the Music icon, and then you will be taken to the Music library page. On the search bar, type the song name you want to add, and the song will be added to the video.
 PaperScan Professional: PaperScan Scanner Software is a powerful TWAIN & WIA scanning application centered on one idea: making document acquisition an unparalleled easy task for anyone.
Part 3: How to Find Trending Songs and Add Them to Your Reels?
Let’s say you have seen a trending song on multiple Instagram Reels and you feel inspired to use the same track for your Reel too. The good news is that you don’t have to keep searching for the Music section for the trending track. Instagram ensures to make adding Music as a background sound easy. Follow the steps that we have written below:
Step 1: Open the Reel whose background music you like, and you will see the name of the song right at the bottom. You need to click on that.
Step 2: After clicking on the song name, you find other Reels who have used the same track. Along with it, you will also see the Use Audio option. Please tap on that.
Step 3: The moment you tap on the Use Audio option, you will be taken to your Reel recording page. Start recording the video you want, and the selected song will be played in the background.

 With Screensaver Wonder you can easily make a screensaver from your own pictures and video files. Create screensavers for your own computer or create standalone, self-installing screensavers for easy sharing with your friends. Together with its sister product Screensaver Factory, Screensaver Wonder is one of the most popular screensaver software products in the world, helping thousands of users decorate their computer screens quickly and easily.
Part 4: How to Add Your Own Background Music to Reels?
In case you don’t want to use any of the songs from Reel’s music section, instead use something of your own; you can do that too! All you will have to do is use any of the music apps on your phone with your Instagram account. Then, play your favorite song, and while doing that, start recording a reel. The music that is being played will be added to the Reel.
Part 5: How to Add Your Own Voice to Instagram Reels?
If you don’t want to add music as your background sound, instead use your voice as a voiceover; Instagram has the voiceover feature that will let you do that. However, you can apply this feature only after finishing your recording.
Step 1: Open your Instagram account and click on your profile to start recording for your Reel. And then record the video as usual for the Reel.
Step 2: If you want to add music, you can do that; if not, just let it be. After the recording is done, you will be taken to another page. Here, you will see some option right at the top of the recorded video. Click on the Microphone icon.
Step 3: Now, start recording your voice. Once you are done recording your voice, click on the Done option.

Part 6: How to Save Reels with Music?
Although the Reels stay there on your profile in the Reels section, they don’t get saved on your mobile automatically. So, if you want to know how to save reels with music on your device, here are the steps you need to follow:
Step 1: Go to your Instagram account and click on your profile picture. When the page appears where you can add a Post, Story, or Reel, you need to click on the top left gear icon, which is the Camera Settings icon.
Step 2: The Camera Settings will show you three things, Story, Reels, Live. You need to click on the Reels option.
Step 3: Now, toggle the Save Reels to Device option to automatically save the Reels you create on your mobile.
Part 7: How to Add Music to Instagram Reels Business Account?
Adding music to a regular Instagram Reels account is easy. You can pick any song that you like and add it as a background sound. However, when it comes to business accounts, there is a restriction. Business accounts can’t add any recording artists’ music to their reels. That’s due to some copyright issues. But, if you have original music, you can add that to your Reel. The key is to search for a song with the words “Original Music.”
Conclusion
Instagram Reels are beneficial for everyone. Whether you are an influencer, celebrity, brand, or someone who likes to have fun using Instagram, Reels are suitable for everyone. It lets you create a short video that enables you to engage with your followers. And after reading this post, we are sure that you have learned how to add audio to your Reel.
Instagram Reels , a new feature, which is taking Instagram by storm. It’s pretty similar to TikTok , meaning it lets you create a short video clip and lasts from 15 to 30 seconds. If you already have an Instagram account, you might have already seen the Reel feature. While creating a Reel, you can make it look and sound better by adding background music and filter. You can share your Reel on your story, and they will appear on the Reels tab on your profile. You can consider Instagram Reels to be an upgraded version of Instagram Stories. It appears on the Story section, doesn’t disappear after 24 hours, and lets you connect with your audience in a better way.
Since Instagram Reels are the coolest new thing to happen to this generation, try to make your Instagram Reel as exciting as possible. One way to go about it is by adding music to your reels. Let others feel pumped up while watching your Reel and engage with it better. So, if you want to know how to add music to Instagram reels, keep reading this post and find out how to do that.
In this article
01 Add Background Music to Instagram Reels While Recording
02 Add Music to Reels After Recording
03 Find Trending Songs and Add Them to Your Reels
04 Add Your Own Background Music to Reels
05 Add Your Own Voice to Instagram Reels
06 How to Save Reels with Music?
07 Add Music to Instagram Reels Business Account
Part 1: How to Add Background Music to Instagram Reels While Recording
First, let’s find out how to add music to reels on Instagram when you record something. The steps to follow are easy. Just follow this step-by-step guide, and you will know-how.
Step 1: Launch your Instagram account and click on your profile picture. The same process that you do to upload a Story.
Step 2: Once done, look at the bottom of your screen, and you will see the Reels option. Please click on that.
Step 3: Now, tap on the record option to record something on Reels.
Step 4: While recording it, you can click on the Music icon to add a song. Alternatively, before recording a video for your Reel, you can tap on the Music icon, search for the song you want to add, and add it.
Step 5: Use the slider bar to select the part of the song that you want to keep. You can adjust the slider to use a different section of the song as well.
Once you are done recording your video along with the background music, click on the preview option to see how your Reel will look like with the audio.

Part 2: How to Add Music to Reels After Recording?
Instagram lets you add music after you complete your recording as well. This option is suitable for those who often forget to add music while they are recording their video. Here’s your how to add music to reels after recording steps:
Step 1: Click on your Instagram profile picture, and then click on the Reels option to start recording a video.
Step 2: After recording your video, click on the Music icon, and then you will be taken to the Music library page. On the search bar, type the song name you want to add, and the song will be added to the video.
Part 3: How to Find Trending Songs and Add Them to Your Reels?
Let’s say you have seen a trending song on multiple Instagram Reels and you feel inspired to use the same track for your Reel too. The good news is that you don’t have to keep searching for the Music section for the trending track. Instagram ensures to make adding Music as a background sound easy. Follow the steps that we have written below:
Step 1: Open the Reel whose background music you like, and you will see the name of the song right at the bottom. You need to click on that.
Step 2: After clicking on the song name, you find other Reels who have used the same track. Along with it, you will also see the Use Audio option. Please tap on that.
Step 3: The moment you tap on the Use Audio option, you will be taken to your Reel recording page. Start recording the video you want, and the selected song will be played in the background.
Part 4: How to Add Your Own Background Music to Reels?
In case you don’t want to use any of the songs from Reel’s music section, instead use something of your own; you can do that too! All you will have to do is use any of the music apps on your phone with your Instagram account. Then, play your favorite song, and while doing that, start recording a reel. The music that is being played will be added to the Reel.
Part 5: How to Add Your Own Voice to Instagram Reels?
If you don’t want to add music as your background sound, instead use your voice as a voiceover; Instagram has the voiceover feature that will let you do that. However, you can apply this feature only after finishing your recording.
Step 1: Open your Instagram account and click on your profile to start recording for your Reel. And then record the video as usual for the Reel.
Step 2: If you want to add music, you can do that; if not, just let it be. After the recording is done, you will be taken to another page. Here, you will see some option right at the top of the recorded video. Click on the Microphone icon.
Step 3: Now, start recording your voice. Once you are done recording your voice, click on the Done option.
Part 6: How to Save Reels with Music?
Although the Reels stay there on your profile in the Reels section, they don’t get saved on your mobile automatically. So, if you want to know how to save reels with music on your device, here are the steps you need to follow:
Step 1: Go to your Instagram account and click on your profile picture. When the page appears where you can add a Post, Story, or Reel, you need to click on the top left gear icon, which is the Camera Settings icon.

Step 2: The Camera Settings will show you three things, Story, Reels, Live. You need to click on the Reels option.
Step 3: Now, toggle the Save Reels to Device option to automatically save the Reels you create on your mobile.
Part 7: How to Add Music to Instagram Reels Business Account?
Adding music to a regular Instagram Reels account is easy. You can pick any song that you like and add it as a background sound. However, when it comes to business accounts, there is a restriction. Business accounts can’t add any recording artists’ music to their reels. That’s due to some copyright issues. But, if you have original music, you can add that to your Reel. The key is to search for a song with the words “Original Music.”
Conclusion
Instagram Reels are beneficial for everyone. Whether you are an influencer, celebrity, brand, or someone who likes to have fun using Instagram, Reels are suitable for everyone. It lets you create a short video that enables you to engage with your followers. And after reading this post, we are sure that you have learned how to add audio to your Reel.
- Title: [Updated] Elevate Instagram's Visual Feast Integrating Audio Effects
- Author: David
- Created at : 2024-07-26 00:18:54
- Updated at : 2024-07-27 00:18:54
- Link: https://instagram-video-recordings.techidaily.com/updated-elevate-instagrams-visual-feast-integrating-audio-effects/
- License: This work is licensed under CC BY-NC-SA 4.0.